概要
少し前にECSのサービスディスカバリが東京リージョンにも登場しました。
Amazon ECS Service Discovery がフランクフルト、ロンドン、東京、シドニー、シンガポールの各リージョンで利用可能に
今回Terraformでの使い方を説明します。
環境
- Terraform v0.11.10
- terraform-provider-aws v1.50.0
設定
Namespaceの設定
まずnamespaceを用意します。実行するとRoute53のドメインとして登録されます。
今回ECSで使う=内部アクセスのみなのでaws_service_discovery_private_dns_namespaceを利用します。
これはVPC内部からしかDNSクエリを叩けません。
resource "aws_vpc" "example" {
  cidr_block = "10.10.0.0/16"
}

resource "aws_service_discovery_private_dns_namespace" "example_internal" {
  name        = "example.internal"
  description = "example"
  vpc         = "${aws_vpc.example.id}"
}
AWS: aws_service_discovery_private_dns_namespace - Terraform by HashiCorp
注意点
- terraformの
data sourceにはまだ載っていないため、idを使う時はtfファイルを同じディレクトリに置くか、べた書きする必要がある - Hosted Zone IDとは別。
ns-xxxxxxxxxxxxxxxxxxxというid。
Service Discoveryの設定
次にService Discoveryの設定です。
今回dev-api.example.internalというドメインでIPが取得できるようにします。
先程のNamespaceがドメインとするとこちらはサブドメインですね。
resource "aws_service_discovery_service" "dev_api" {
  name = "dev-api"

  dns_config {
    namespace_id = "${aws_service_discovery_private_dns_namespace.example_internal.id}"

    dns_records {
      ttl  = 10
      type = "A"
    }

    routing_policy = "MULTIVALUE"
  }

  health_check_custom_config {
    failure_threshold = 1
  }
}
AWS: aws_service_discovery_service - Terraform by HashiCorp
ポイント
routing_policyにMULTIVALUEを使うhealth_check_custom_configでdocker health checkによって判定させる
です。
MULTIVALUEの嬉しいところは?
各IP毎にヘルスチェックを行える点です。詳細は以下を参考にしてください。
これによって死んだコンテナはDNSクエリで返らなくなります。
health_check_configではなくhealth_check_custom_configを使うのは?
health_check_configはpublicなドメインでしか使えません。つまりaws_service_discovery_public_dns_namespaceの方を使った場合です。
理由はRoute53のヘルスチェックは外部から叩かれるため、外部公開=publicでないとそもそも疎通ができずunhealthyになってしまいます。
health_check_custom_configの方はインスタンスやコンテナ(タスク)のヘルスステータスを使って判定してくれます。
Class: Aws::ServiceDiscovery::Types::CreateServiceRequest — AWS SDK for Ruby V3
ECS Serviceの設定
今回Fargateを利用しますがこんな感じになります。
resource "aws_ecs_service" "dev_api" {
  name                               = "dev-api-service"
  cluster                            = "${aws_ecs_cluster.private_cluster.id}"
  task_definition                    = "${aws_ecs_task_definition.dev_api.arn}"
  desired_count                      = 2
  deployment_minimum_healthy_percent = 100
  deployment_maximum_percent         = 200
  launch_type                        = "FARGATE"

  network_configuration = {
    security_groups = [
      "${aws_security_group.dev_private_subnet.id}",
    ]

    subnets = ["${aws_subnet.dev_private.id}"]
  }

  service_registries {
    registry_arn = "${aws_service_discovery_service.dev_api.arn}"
  }

}
ポイント
service_registriesにregistry_arnだけを設定することport、container_port、container_nameは自前でService Discoveryを用意してるケースのみ利用
AWS: aws_ecs_service - Terraform by HashiCorp
Task Definitionの設定
簡単のため色々省略してますが以下のようになります。
[
  {
    "name": "datadog-agent",
    "image": "datadog/agent:latest",
    "cpu": 128,
    "memoryReservation": 256,
    "essential": true,
    "environment": [
      {
        "name": "DD_API_KEY",
        "value": "xxxx"
      },
      {
        "name": "ECS_FARGATE",
        "value": "true"
      }
    ],
  },
  {
    "name": "dev-api",
    "image": "xxx.dkr.ecr.ap-northeast-1.amazonaws.com/dev-api",
    "cpu": 256,
    "memoryReservation": 384,
    "essential": true,
    "portMappings": [
      {
        "protocol": "tcp",
        "containerPort": 3000,
        "hostPort": 3000
      }
    ],
    "healthCheck": {
      "command": [
        "CMD-SHELL",
        "wget -q -O - http://localhost:3000/|| exit 1"
      ],
      "interval": 5,
      "retries": 3,
      "startPeriod": 60,
      "timeout": 5
    }
]
ポイント
healthCheckを入れてください- 今回はalpineなので
curlはデフォルトでは入っていないのでwgetを使っています。 - healthCheckの各フィールドはデフォルト値を使うとしても全て入力してください。でないとplan時の変更点に毎回出ます
- 今回はalpineなので
気になった点
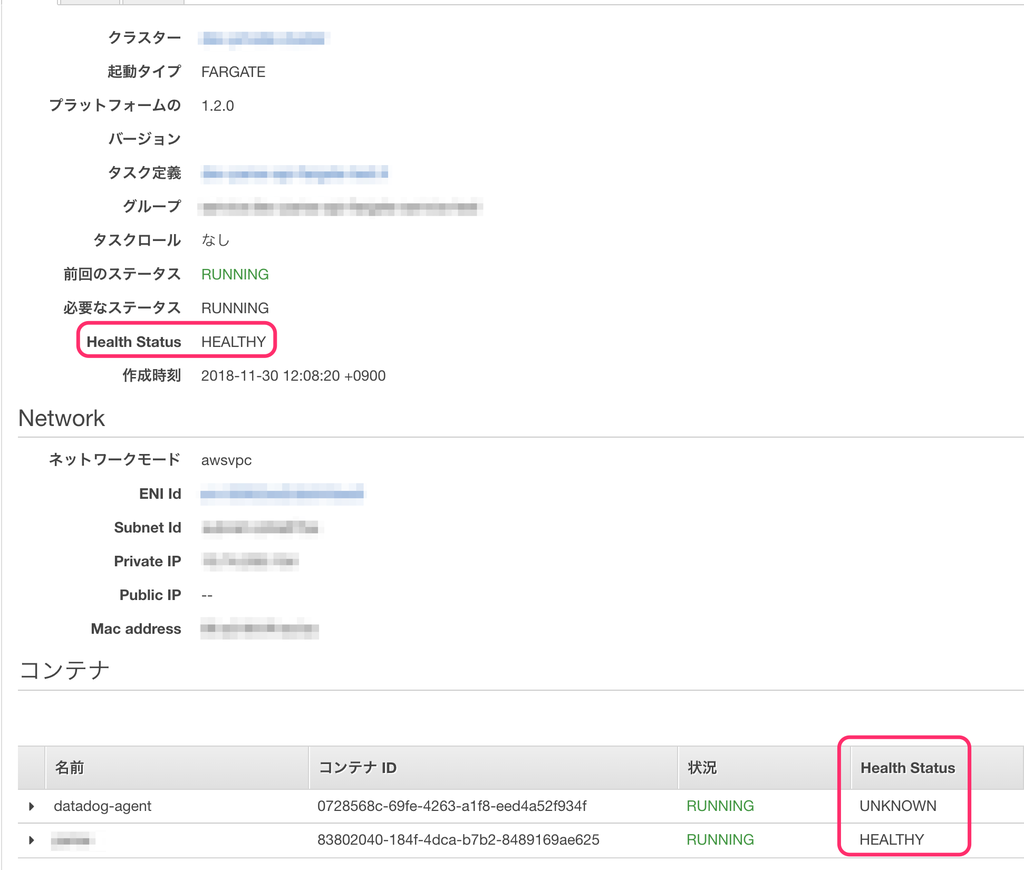
ドキュメントでは"essential": trueのコンテナに1つでもunhealthy or unknownがある場合はタスクの状態もunhealthy or unknownとなるとあったのに対し、healthCheckを入れないdatadogコンテナがあってもタスク状態はhealthyになりました。
Task health is reported by the healthStatus of the task, which is determined by the health of the essential containers in the task. If all essential containers in the task are reporting as HEALTHY, then the task status also reports as HEALTHY. If any essential containers in the task are reporting as UNHEALTHY or UNKNOWN, then the task status also reports as UNHEALTHY or UNKNOWN, accordingly.
Task - Amazon EC2 Container Service

その他
MULTIVALUEの負荷分散はどうなっているのか?
通常のELBは
という仕組みになっていますが、MULTIVALUEはラウンドロビンによる負荷分散のみです。
注意: 複数値回答ルーティングは、Elastic Load Balancing (ELB) に代わるものではありません。Route 53 は 8 個のレコードをランダムに選択します。ドメイン名に対して dig (Linux の場合) または nslookup (Windows の場合) を複数回実行すると、IP アドレスのローテーションに気付く場合があります。このローテーションで可用性が向上し、ある程度のロードバランシング機能が提供されます。オペレーティングシステムでは、Route 53 ではなく、キャッシュされたレスポンスで、このラウンドロビン DNS を実行します。
複数値ルーティングポリシーとシンプルルーティングポリシーを理解する
実際にdigしてみると毎回IPの順番が変わっていることが確認できます。
$ dig dev-api.example.internal
;; ANSWER SECTION:
dev-api.example.internal. 9    IN  A   10.10.211.50
dev-api.example.internal. 9    IN  A   10.10.212.150

$ dig dev-pi.example.internal
;; ANSWER SECTION:
dev-api.example.internal. 9    IN  A   10.10.212.150
dev-api.example.internal. 9    IN  A   10.10.211.50
IPからの逆引きはできない
正引きはできますが逆引きはできませんでした。
$ dig -x 10.10.211.50
;; ANSWER SECTION:
50.211.10.10.in-addr.arpa. 600  IN  PTR ip-10-10-211-50.ap-northeast-1.compute.internal.
VPN経由では見れない
private DNSの場合169.254.169.253を叩いて取得するため、これが叩ける環境じゃないとIPは取得できません。
※追記
AmazonProvidedDNSをVPNサーバのDNS設定に指定したところ内部ドメインも解決できました。
もしくはMacであれば以下のように
# mkdir /etc/resolver/
# echo nameserver 10.10.0.2 > /etc/resolver/example.internal
example.internalドメインのみAmazonProvidedDNS(VPCが10.10.0.0/16なので今回なら10.10.0.2)を見るようにすると、そのドメインのみnameserverを指定して名前解決できます。
まとめ
ECSでのサービスディスカバリの利用方法を説明しました。
- マイクロサービスのサービスディスカバリとして利用したい
- ECSでは1サービスに対し1つのELBしか紐づけられないので、外部用にELB、内部用にこのドメインを使う
といったケースで有用かと思います。