概要
ではEnvoyでのCircuit Breakerの設定や挙動について説明しました。
IstioではDataPlaneにEnvoyを使っているので同じ様にCircuit Breakerを使えますが、設定するコンポーネントとしてはDestination Ruleになります。
今回はIstioでの設定方法について説明します。
環境
- Istio 1.16.1
パラメータ
Istio(Destination Rule)のパラメータとEnvoyのパラメータの比較です。
| Istio | Envoy | 説明 | デフォルト値 |
|---|---|---|---|
| tcp.maxConnections | max_connections | upstreamクラスタに接続する最大TCPコネクション数 | 232-1 |
| http.http1MaxPendingRequests | max_pending_requests | コネクションプール接続の準備ができるのを待つ間、キューに入れられるリクエストの最大数 | 1024 |
| http.http2MaxRequests | max_requests | upstreamクラスタに対するアクティブなリクエストの最大数 | 1024 |
設定例
ユースケースに応じた設定例を紹介します。
- シンプルなケース
- 特定のgRPCやHTTPリクエストだけ適用させたいケース
- 外部APIに適用させたいケース
シンプルな設定
シンプルにあるサービスに対してCircuit Breakerを設定したいケースです。DestinationRuleリソースの追加だけでOKです。
apiVersion: networking.istio.io/v1beta1
kind: DestinationRule
metadata:
  name: my-app
  namespace: default
spec:
  host: my-app.default.svc.cluster.local
  trafficPolicy:
    connectionPool:
      http:
        http2MaxRequests: 100
設定確認はistioctlで可能です。
$ istioctl proxy-config cluster my-app-76d5d46fd9-2j7j4 -o yaml > istio-cluster.yaml
以下のような設定値が表示されます。
- circuitBreakers:
    thresholds:
    - maxConnections: 4294967295
      maxPendingRequests: 4294967295
      maxRequests: 100
      maxRetries: 4294967295
      trackRemaining: true
  cleanupInterval: 60s
  connectTimeout: 10s
  lbPolicy: CLUSTER_PROVIDED
  metadata:
    filterMetadata:
      istio:
        config: /apis/networking.istio.io/v1alpha3/namespaces/default/destination-rule/my-app
        services:
        - host: my-app.default.svc.cluster.local
          name: my-app
          namespace: default
  name: inbound|8080||
  type: ORIGINAL_DST
  typedExtensionProtocolOptions:
    envoy.extensions.upstreams.http.v3.HttpProtocolOptions:
      '@type': type.googleapis.com/envoy.extensions.upstreams.http.v3.HttpProtocolOptions
      useDownstreamProtocolConfig:
        http2ProtocolOptions:
          maxConcurrentStreams: 1073741824
        httpProtocolOptions: {}
  upstreamBindConfig:
    sourceAddress:
      address: 127.0.0.6
      portValue: 0
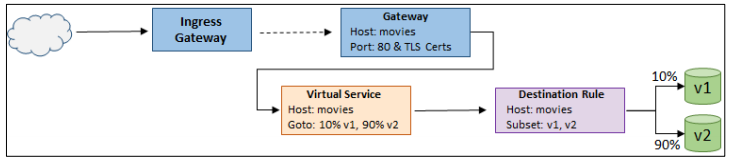
特定のgRPCのみに適用する
特定のgRPCやHTTPリクエストのみに適用したい、といった形でルーティングを細かく管理できるSubsetという機能を用います。
- DestinationRuleのSubsetでルーティング先を定義
- VirtualServiceでルーティング方針を定義
という流れになります。↓のようなイメージですね。
DestinationRule
制限したいgRPCにのみトラフィックポリシーを指定します。
apiVersion: networking.istio.io/v1beta1
kind: DestinationRule
metadata:
  name: my-app
  namespace: default
spec:
  host: my-app.default.svc.cluster.local
  subsets:
    - name: my-app-get-user
      trafficPolicy:
        connectionPool:
          http:
            http2MaxRequests: 120
    - name: my-app-default
注意なのは
traffic policies defined at the service-level can be overridden at a subset-level.
ref: https://istio.io/latest/docs/reference/config/networking/destination-rule/#Subset
とあるように、上位でトラフィックポリシーを設定してもsubset内で設定していない場合は未設定扱いされてしまいます。
トラフィックポリシー設定が可能な箇所は以下のように複数あり、
spec.trafficPolicy.connectionPoolspec.subsets.trafficPolicy.connectionPoolspec.subsets.trafficPolicy.portLevelSettings.connectionPool
例えば
- subsetを使っているのに
spec.subsets.trafficPolicy.connectionPoolではなくspec.trafficPolicy.connectionPoolで指定している。 - portLevelSettingsを使っているのに
spec.subsets.trafficPolicy.portLevelSettings.connectionPoolではなくspec.subsets.trafficPolicy.connectionPoolで指定している
ようなケースでは未設定扱いされてしまうので注意してください。
VirtualService
制限したいgRPCに対しuriマッチでルーティングを制御します。
VirtualServiceはEnvoyのVirtual hostと同様で先頭から順に走査し先に一致したものが適用されます。
詳細は↓を見てみてください。
なので具体的なgRPCを上に、デフォルトルーティングを下に書きます。
apiVersion: networking.istio.io/v1beta1
kind: VirtualService
metadata:
  name: my-app
  namespace: default
spec:
  hosts:
    - my-app.default.svc.cluster.local
  http:
    - name: get-user
      match:
        - uri:
            exact: /user.UserService/GetUser
      route:
        - destination:
            host: my-app.default.svc.cluster.local
            subset: my-app-get-user
    - name: default
      route:
        - destination:
            host: my-app.default.svc.cluster.local
            subset: my-app-default
uriの指定方法は/package.ServiceName/RpcNameです。
例えば以下のようなproto定義であった場合は
syntax = "proto3";

package mybackends

import "google/protobuf/empty.proto";

service EchoService {
  rpc Echo(google.protobuf.Empty) returns (google.protobuf.Empty);
}
/mybackends.EchoService/Echoとなります。
外部APIに適用する
外部APIに対してCircuit Breakerを設定したい場合はServiceEntryを用います。
ServiceEntry
まずServiceEntryでk8s Serviceのサービスレジストリ管理外のドメインをIstioで扱えるようにします。
apiVersion: networking.istio.io/v1beta1
kind: ServiceEntry
metadata:
  name: external-svc
spec:
  hosts:
    - external-api.com
  location: MESH_EXTERNAL
  ports:
    - number: 443
      name: tls
      protocol: TLS
  resolution: DNS
DestinationRule
次にTLS始端の設定とCircuit Breakerの指定を行います。
※今回subsetを挟んでいますがなくても大丈夫なはずです
apiVersion: networking.istio.io/v1alpha3
kind: DestinationRule
metadata:
  name: external-api
spec:
  host: external-api.com
  subsets:
    - name: tls-origination
      trafficPolicy:
        portLevelSettings:
          - port:
              number: 443
            tls:
              mode: SIMPLE
              sni: external-api.com
            connectionPool:
              http:
                http2MaxRequests: 10
VirtualService
最後にVirtualServiceで先程DestinationRuleで作ったSubsetへのルーティングを用意します。
apiVersion: networking.istio.io/v1beta1
kind: VirtualService
metadata:
  name: external-api
spec:
  hosts:
    - external-api.com
  http:
    - match:
        - port: 80
      timeout: 10s
      route:
        - destination:
            host: external-api.com
            subset: tls-origination
            port:
              number: 443
これでアプリケーションからhttp://external-api.comにリクエストを送ると、Envoy側でTLS始端してEnvoy以降はhttps://external-api.comでアクセスされるようになります。
その他
DestinationRuleで設定したCircuit Breakerパラメータはinbound/outbound両方設定される
先程の例ではinboundに対する設定にのみ触れていましたが、Destination Ruleを設定するとoutboundにも設定がされます。
- circuitBreakers:
    thresholds:
    - maxConnections: 4294967295
      maxPendingRequests: 4294967295
      maxRequests: 10
      maxRetries: 4294967295
      trackRemaining: true
  connectTimeout: 10s
  edsClusterConfig:
    edsConfig:
      ads: {}
      initialFetchTimeout: 0s
      resourceApiVersion: V3
    serviceName: outbound|8080||my-app.default.svc.cluster.local
  filters:
  - name: istio.metadata_exchange
    typedConfig:
      '@type': type.googleapis.com/envoy.tcp.metadataexchange.config.MetadataExchange
      protocol: istio-peer-exchange
  lbPolicy: LEAST_REQUEST
  metadata:
    filterMetadata:
      istio:
        config: /apis/networking.istio.io/v1alpha3/namespaces/default/destination-rule/my-app
        default_original_port: 8080
        services:
        - host: my-app.default.svc.cluster.local
          name: my-app
          namespace: default
  name: outbound|8080||my-app.default.svc.cluster.local
イメージとしては以下です。
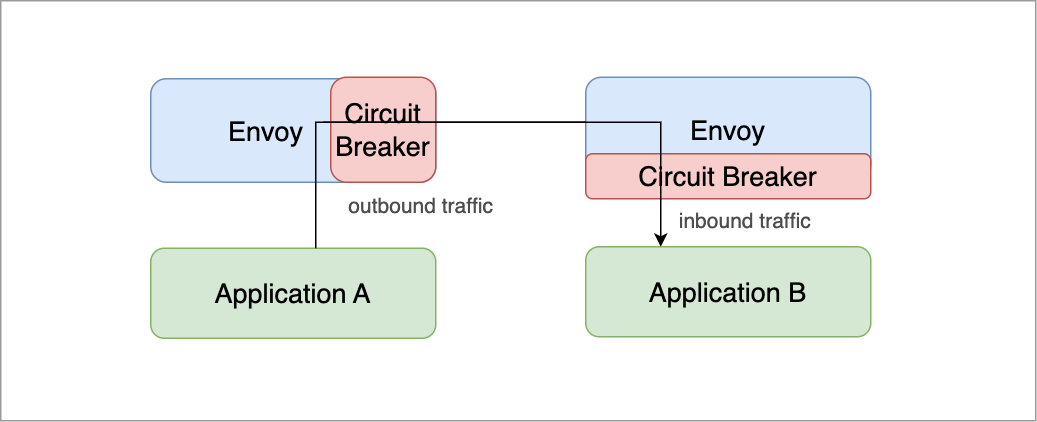
Application BにCircuit Breakerの設定を入れた場合も、そのServiceに対するoutboundなトラフィックに対してCircuit Breakerが適用されます。
なので
- Application BのCircuit Breakerしきい値が低い(キャパシティが小さい)
- Application BのPodを大量に水平スケールさせている
- Application AのPodが少ない
ようなパターンだと、このoutboundのしきい値に引っかかる可能性があります。
http2MaxRequestsはなぜこの呼び方?
http2MaxRequestsはHTTP/1.1もHTTP2もサポートしてるのになぜこの呼び方になっているのか、です。
Envoyが元々http2のみ対応だったのですがが、後からhttp1も対応して不整合が発生したみたいです。
まとめ
IstioのDestination RuleでCircuit Breakerを適用する方法を紹介しました。
subsetを使った時のtrafficPolicyの書き場所であったり、matchの適用順であったりと地味にハマることが多いので、istioctlで適宜configを確認しながら導入を進めるのが良いでしょう。