概要
前回紹介したBackstageをローカルで使うための説明です。
開発者ポータル Backstage とは - Carpe Diem
環境
- backstage v1.21.1
- yarn v1.22.19
Get Started
とりあえず起動してみる
アプリケーション作成
以下のコマンドでアプリケーションを作成できます。
今回はmy-appという名前で作るとします。
$ npx @backstage/create-app@latest
? Enter a name for the app [required] my-app
もし次のエラーが出た場合は
Error: @backstage/create-app requires Yarn v1, found '4.0.0-rc.39'. You can migrate the project to Yarn 3 after creation using https://backstage.io/docs/tutorials/yarn-migration
次のようにyarnのバージョンを固定してください。
$ yarn set version 1.22.19
起動
$ cd my-app
$ yarn dev
yarn devを実行すると、フロントエンドとバックエンドの両方を実行して起動します。
自動的にブラウザが立ち上がりhttp://localhost:3000/を開きます。

ファイル構成
次に開発する上で覚えておくべきファイル構成について説明します。
アプリケーションを作成すると次のようなファイルが出来上がります。
.
├── README.md
├── app-config.local.yaml
├── app-config.production.yaml
├── app-config.yaml
├── backstage.json
├── catalog-info.yaml
├── dist-types
│   ├── packages
│   └── tsconfig.tsbuildinfo
├── examples
│   ├── entities.yaml
│   ├── org.yaml
│   └── template
├── lerna.json
├── node_modules
├── package.json
├── packages
│   ├── README.md
│   ├── app
│   └── backend
├── playwright.config.ts
├── plugins
│   └── README.md
├── tsconfig.json
└── yarn.lock
よくいじる場所のそれぞれの役割を簡単に説明します。
| ファイル・ディレクトリ | 説明 |
|---|---|
| app-config.yaml | Backstageアプリケーションの設定を記述 |
| app-config.local.yaml | ローカル開発においてapp-config.yamlを上書きしたい部分を記述 |
| app-config.production.yaml | プロダクション環境においてapp-config.yamlを上書きしたい部分を記述 |
| catalog-info.yaml | Software Catalogのカタログファイル。カタログには任意のファイルを読み込めるためここに書かなくても良い |
| packages/app | Backstageアプリケーションのフロントエンド実装 |
| packages/backend | Backstageアプリケーションのバックエンド実装 |
app-config
Backstageのconfigの設定は主に2通り方法があります。
app-config.yamlというファイルで設定APP_CONFIG_xxxという環境変数で直接設定
複数のファイルで定義されていたり、環境変数などでも設定されていた場合は優先度に基づいて適用されます。 またObject型の設定は優先度に基づいてKustomizeのようにマージされて適用されます。
ファイルの場合
$ yarn start --config ../../app-config.yaml --config ../../app-config.staging.yaml
のように--configパラメータで複数指定可能です。
相対パスの指定方法
上記の指定で気づくように、../../app-config.yamlのように上位ディレクトリに遡っています。
これはyarnの場合ワーキングディレクトリ(ディレクトリルート)はworkspaceになる、つまり
- packages/app/
- packages/backend/
なので、app-config.yamlの場所は2階層上ということでそう指定します。
Dockerでビルドする場合
yarnでなくnodeで実行する場合は↑を考慮する必要がなくなるのでディレクトリルートの位置から指定します。
CMD ["node", "packages/backend", "--config", "app-config.yaml", "--config", "app-config.production.yaml"]
環境変数の場合
app-config.yamlでの設定値の. を _にしてprefixのAPP_CONFIG_をつけます。
例えばapp-config.yamlでapp.baseUrlの場合、APP_CONFIG_app_baseUrlという環境変数になります。
読み込み順
次の順に優先的に適用されます。
APP_CONFIG_xxxの値--config xxx.yamlで設定した時、後方が優先度高い--configがない場合、app-config.local.yaml>app-config.yamlの優先度- なのでローカル開発だと
app-config.local.yamlが優先される
- なのでローカル開発だと
Software Catalog
次のSoftware Catalogについて説明します。
よく使う要素としては以下の5つがあります。
- API
- Component
- Resource
- User
- Group
それぞれの関係は次の図の通りです。
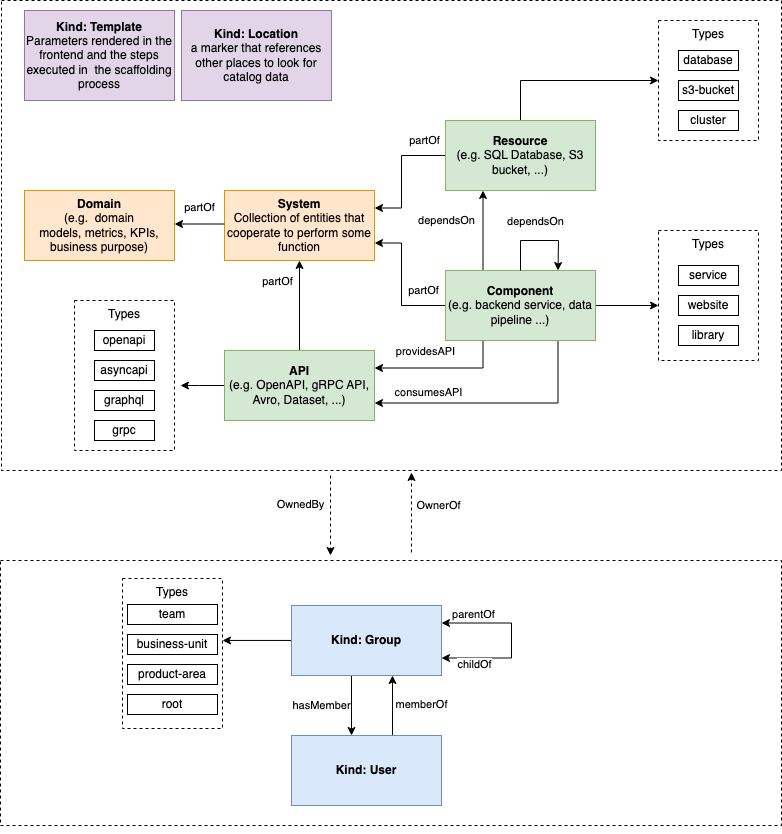
ref: System Model | Backstage Software Catalog and Developer Platform
User, GroupはGitHub Orgの情報と自動連携することもできるので、実際にいじるのはAPI、Component、Resource辺りになります。
細かい設定は次のドキュメントを参考にしてください。
Descriptor Format of Catalog Entities | Backstage Software Catalog and Developer Platform
examples
アプリケーション作成直後のapp-config.yamlには以下の設定が入っています。
catalog:
  import:
    entityFilename: catalog-info.yaml
    pullRequestBranchName: backstage-integration
  rules:
    - allow: [Component, System, API, Resource, Location]
  locations:
    # Local example data, file locations are relative to the backend process, typically `packages/backend`
    - type: file
      target: ../../examples/entities.yaml

    # Local example template
    - type: file
      target: ../../examples/template/template.yaml
      rules:
        - allow: [Template]

    # Local example organizational data
    - type: file
      target: ../../examples/org.yaml
      rules:
        - allow: [User, Group]
相対パスが../../examplesとなっているのは先程のapp-config.yamlと同様で、packages/backendの位置から見たファイルを指定しているためです。
examples/entities.yamlには次のようなコードがあります。
---
# https://backstage.io/docs/features/software-catalog/descriptor-format#kind-system
apiVersion: backstage.io/v1alpha1
kind: System
metadata:
  name: examples
spec:
  owner: guests
---
# https://backstage.io/docs/features/software-catalog/descriptor-format#kind-component
apiVersion: backstage.io/v1alpha1
kind: Component
metadata:
  name: example-website
spec:
  type: website
  lifecycle: experimental
  owner: guests
  system: examples
  providesApis: [example-grpc-api]
---
# https://backstage.io/docs/features/software-catalog/descriptor-format#kind-api
apiVersion: backstage.io/v1alpha1
kind: API
metadata:
  name: example-grpc-api
spec:
  type: grpc
  lifecycle: experimental
  owner: guests
  system: examples
  definition: |
    syntax = "proto3";

    service Exampler {
      rpc Example (ExampleMessage) returns (ExampleMessage) {};
    }

    message ExampleMessage {
      string example = 1;
    };
このようにコンポーネントをYamlで定義してBackstageはシステムの情報の集約・依存関係の可視化を行います。

ただしapp-config.yamlでカタログファイルの場所を指定するのは柔軟性が低い(ファイルの追加・変更のたびにデプロイが必要になったり)ため、実際の運用では次のように外部ファイルとして読み込むやり方がオススメです。
外部ファイルからの読み込み
実際に運用してみると分かりますが、Backstageアプリケーション自体とこういったカタログファイルのライフサイクルは異なるため別のリポジトリで管理した方が扱いやすいです。
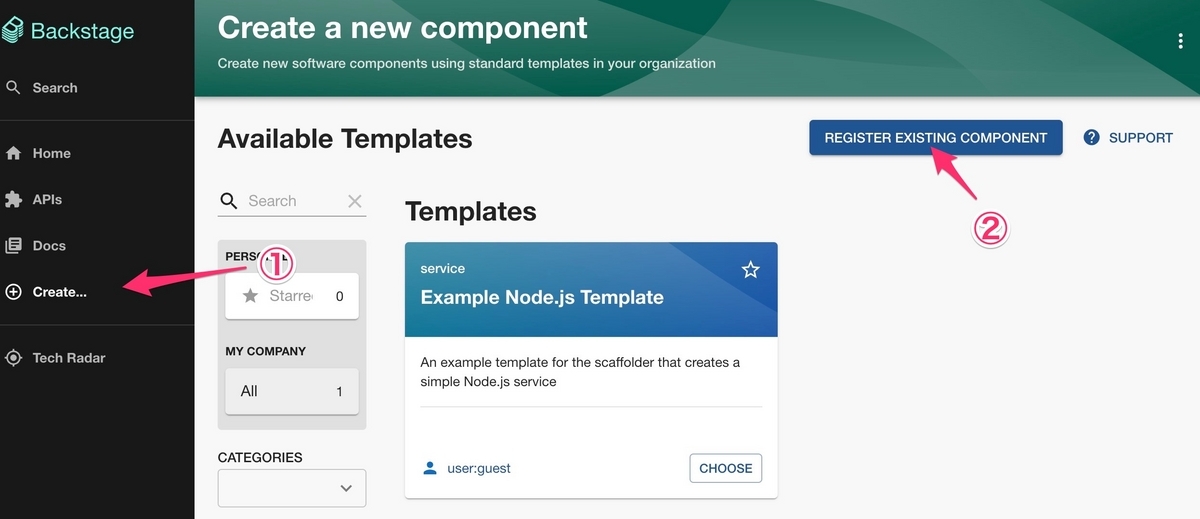
Publicなリポジトリであれば(例として https://github.com/jun06t/backstage-sample/blob/main/catalog-info.yaml を読み込ませます)

Analyzeボタンを押すとvalidationを行って問題なければImportボタンが押せます。
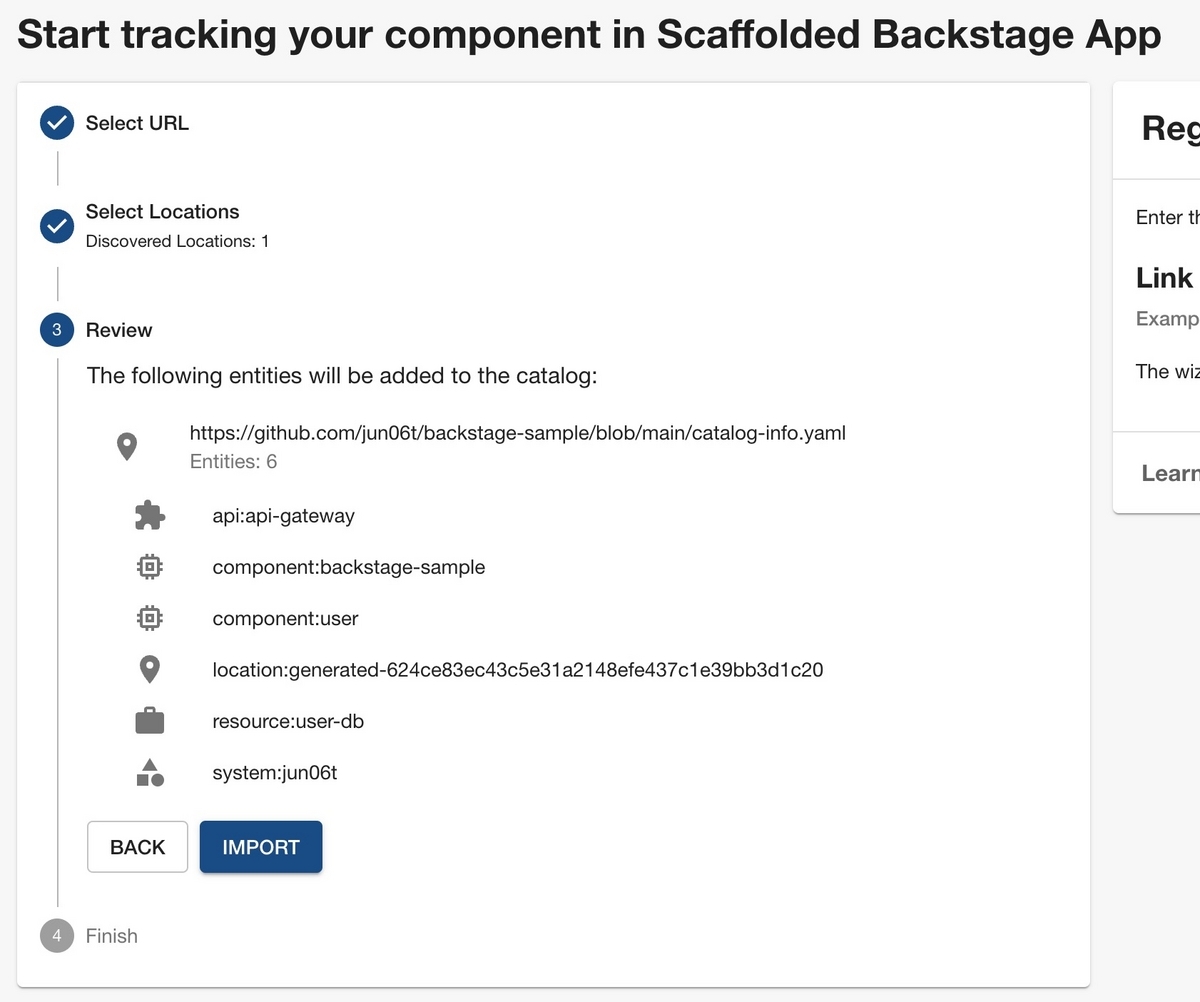
Importボタンを押すとCatalogページに追加されます。

Publicリポジトリなのに401エラーが出る
もし次のような401エラーが出る場合、
{"error":{"name":"InputError","message":"Error: Unable to read url, Error: https://github.com/jun06t/backstage-sample/tree/main/catalog-info.yaml could not be read as https://api.github.com/repos/jun06t/backstage-sample/contents/catalog-info.yaml?ref=main, 401 Unauthorized","stack":"InputError: Error: Unable to read url, Error: https://github.com/jun06t/backstage-sample/tree/main/catalog-info.yaml could not be read
おそらくアプリケーション作成時に次のようにgithub integrationが設定されているせいです。
GITHUB_TOKENを設定するか、次のようにコメントアウトすれば読み込めるようになります。
integrations:
  github:
    - host: github.com
      # This is a Personal Access Token or PAT from GitHub. You can find out how to generate this token, and more information
      # about setting up the GitHub integration here: https://backstage.io/docs/getting-started/configuration#setting-up-a-github-integration
      token: ${GITHUB_TOKEN}
↓
#integrations:
#  github:
#    - host: github.com
#      # This is a Personal Access Token or PAT from GitHub. You can find out how to generate this token, and more information
#      # about setting up the GitHub integration here: https://backstage.io/docs/getting-started/configuration#setting-up-a-github-integration
#      token: ${GITHUB_TOKEN}
rules
前述のように外部ファイルから読み込む場合はexamplesのファイルは不要になるので設定から削除します。
catalog:
  import:
    entityFilename: catalog-info.yaml
    pullRequestBranchName: backstage-integration
  rules:
    - allow: [Component, System, API, Resource, Location]
  locations:
    # Local example data, file locations are relative to the backend process, typically `packages/backend`
    - type: file
      target: ../../examples/entities.yaml

    # Local example template
    - type: file
      target: ../../examples/template/template.yaml
      rules:
        - allow: [Template]

    # Local example organizational data
    - type: file
      target: ../../examples/org.yaml
      rules:
        - allow: [User, Group]
↓
catalog:
  rules:
    - allow: [API, Component, System, Group, User, Resource, Location, Template]
ただしrulesに関しては各Kindが許可されてないとimport時にエラーが発生するので、このように書いておくことをオススメします。
まとめ
Backstageの起動〜ファイルの設定周りの簡単な説明しました。