概要
Pull型の監視サービスであるPrometheusの使い方を説明します。
環境
- Prometheus 2.11.1
- Node exporter 0.18.1
アーキテクチャ
Prometheusのアーキテクチャはこの様になっています。

大まかな特徴としては以下です。
- Pull型(over HTTP)の監視サービス
- 独自のデータストアを持つ
- PromQLという独自の柔軟なクエリを持つ
- 監視対象ではexporter(マシンやコンテナのステータスを返す口)を用意して、PrometheusServerがPullする
- アラートはAlertmanagerという別コンポーネントで対応
- 可視化はGrafanaを使う
事前準備
今回は
- Prometheusがステートを持つ
- NodeはコンテナでなくVMを想定している
ということでVagrantを使います。
Vagrant.configure("2") do |config|
  config.vm.define :prometheus do |web|
    web.vm.network :private_network, ip: "192.168.33.10"
  end

  config.vm.define :node do |web|
    web.vm.network :private_network, ip: "192.168.33.11"
  end
end
こんな感じに2台起動するようにします。なので以下のようになります。
| VM名 | IP |
|---|---|
| Prometheus | 192.168.33.10 |
| Node | 192.168.33.11 |
Prometheus Server
インストール
Download | Prometheus から最新版をダウンロードしてください。
$ wget https://github.com/prometheus/prometheus/releases/download/v2.11.1/prometheus-2.11.1.linux-amd64.tar.gz
configの確認
解答したディレクトリにあるprometheus.yamlを見てみます。
global:
  scrape_interval:     15s # Set the scrape interval to every 15 seconds. Default is every 1 minute.
  evaluation_interval: 15s # Evaluate rules every 15 seconds. The default is every 1 minute.
  # scrape_timeout is set to the global default (10s).

# Alertmanager configuration
alerting:
  alertmanagers:
  - static_configs:
    - targets:
      # - alertmanager:9093

# Load rules once and periodically evaluate them according to the global 'evaluation_interval'.
rule_files:
  # - "first_rules.yml"
  # - "second_rules.yml"

# A scrape configuration containing exactly one endpoint to scrape:
# Here it's Prometheus itself.
scrape_configs:
  # The job name is added as a label `job=<job_name>` to any timeseries scraped from this config.
  - job_name: 'prometheus'

    # metrics_path defaults to '/metrics'
    # scheme defaults to 'http'.

    static_configs:
    - targets: ['localhost:9090']
localhost:9090とあるように、デフォルトの設定では監視対象はPrometheus Server自身になっています。
起動
まずは試しに起動してみます。
$ ./prometheus
メトリクス
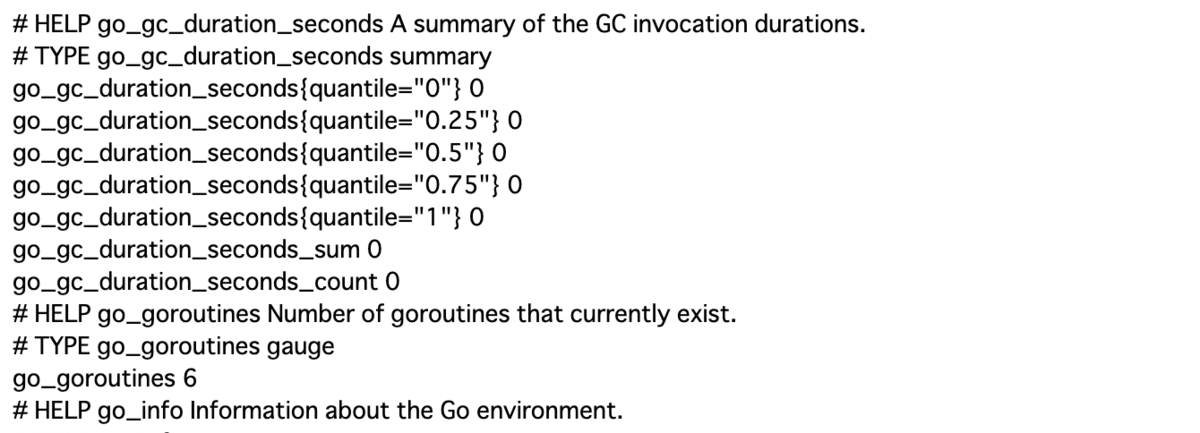
Prometheus Serverは、exporterを設定しなくても自分でメトリクスの口を持っています。
http://192.168.33.10:9090/metrics

WebUI
Prometheus Serverは簡素ですがWebUIを持っています。
このUIはPromQLクエリを実行できる式ブラウザで、これを元に簡単な動作確認ができます。
http://192.168.33.10:9090/graph

PromQLの実行
up式
targetが起動しているか確認のためのup式を試してみます。

1と表示されていることから起動数が1あるということが分かります。
またElement内を見ると、実際は以下のPromQLが実行されていることが分かります。
up{instance="localhost:9090",job="prometheus"}
process_resident_memory_bytes
次にprometheusプロセスのメモリ使用量を確認します。process_resident_memory_bytesと入力します。

102674432バイトと表示されてます。100MBほど使っているということですね。
前提としてPrometheusはバイトや秒といった基本単位を使います。
グラフ
先程のメモリは瞬間的な値です。メモリやCPU使用率といった値は継続した値も知りたいものです。
画面のGraphタブをクリックすると以下のように継続的なグラフが確認できます。

ゲージとカウンタ
メトリクスには大きく以下の2つのタイプがあります。
| タイプ | ポイント |
|---|---|
| ゲージ | 現在の絶対的な数値 |
| カウンタ | 発生したすべてのイベントの合計件数。 増減のrateが重要 |
先程のprocess_resident_memory_bytesはゲージタイプです。次はカウンタタイプを見てみます。
prometheus_tsdb_head_samples_appended_total
Prometheusがインジェストしたサンプル数のメトリクスです。
常に取り込んでいるので、このように常に増加していきます。

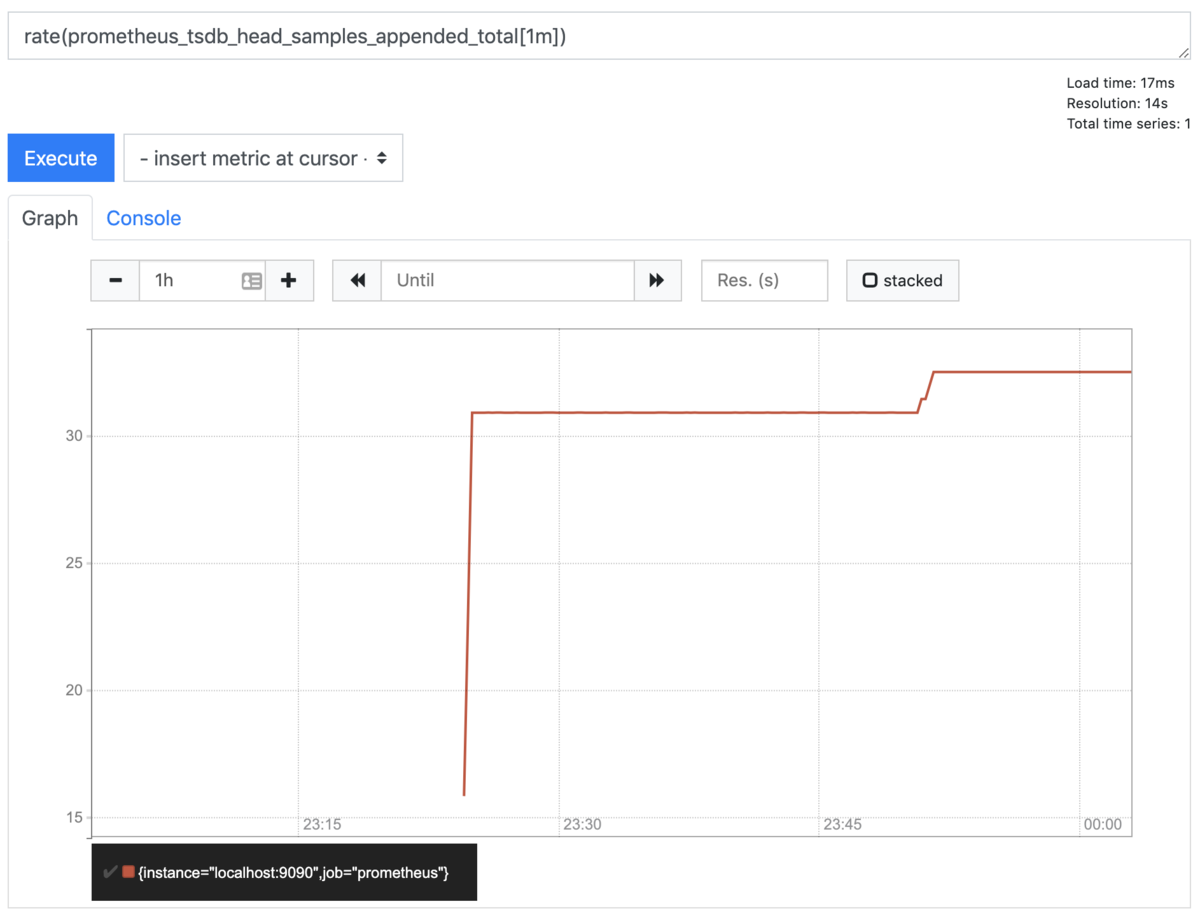
しかし重要なのは増加すること自体でなく、どのようなペースで変化していくかです。rate関数で挟んであげます。
rate(prometheus_tsdb_head_samples_appended_total[1m])
rate関数で挟んだことで増加率が一定であることが確認できました。

Node Exporter
Prometheus Server自体のメトリクスで簡単な使い方を学びました。
今度は別VMにNode exporterをインストールして、そのVMのメトリクスを取得してみます。
Node exporterのインストール
Download | Prometheus から最新版をダウンロードしてください。
$ wget https://github.com/prometheus/node_exporter/releases/download/v0.18.1/node_exporter-0.18.1.linux-amd64.tar.gz
実行
解凍して実行します
$ ./node_exporter
http://192.168.33.11:9100/ にアクセスすると

このような簡素なWebUIが表示されます。
Metricsをクリックすると

先程のPrometheus Serverでも見たようなメトリクスが確認できます。
Prometheus側の設定
以下のように初期設定を修正して、Node192.168.33.11も監視対象にします。
global:
  scrape_interval:     15s
  evaluation_interval: 15s
scrape_configs:
  - job_name: 'prometheus'
    static_configs:
    - targets: ['localhost:9090']
  - job_name: 'node'
    static_configs:
    - targets: ['192.168.33.11:9100']
Prometheus Serverを再起動してください
動作確認
Targets
上部メニューのTargetをクリックすると

以下のようにprometheus, nodeの両方が表示されます。

up式
Nodeの方も検知されるようになりました。

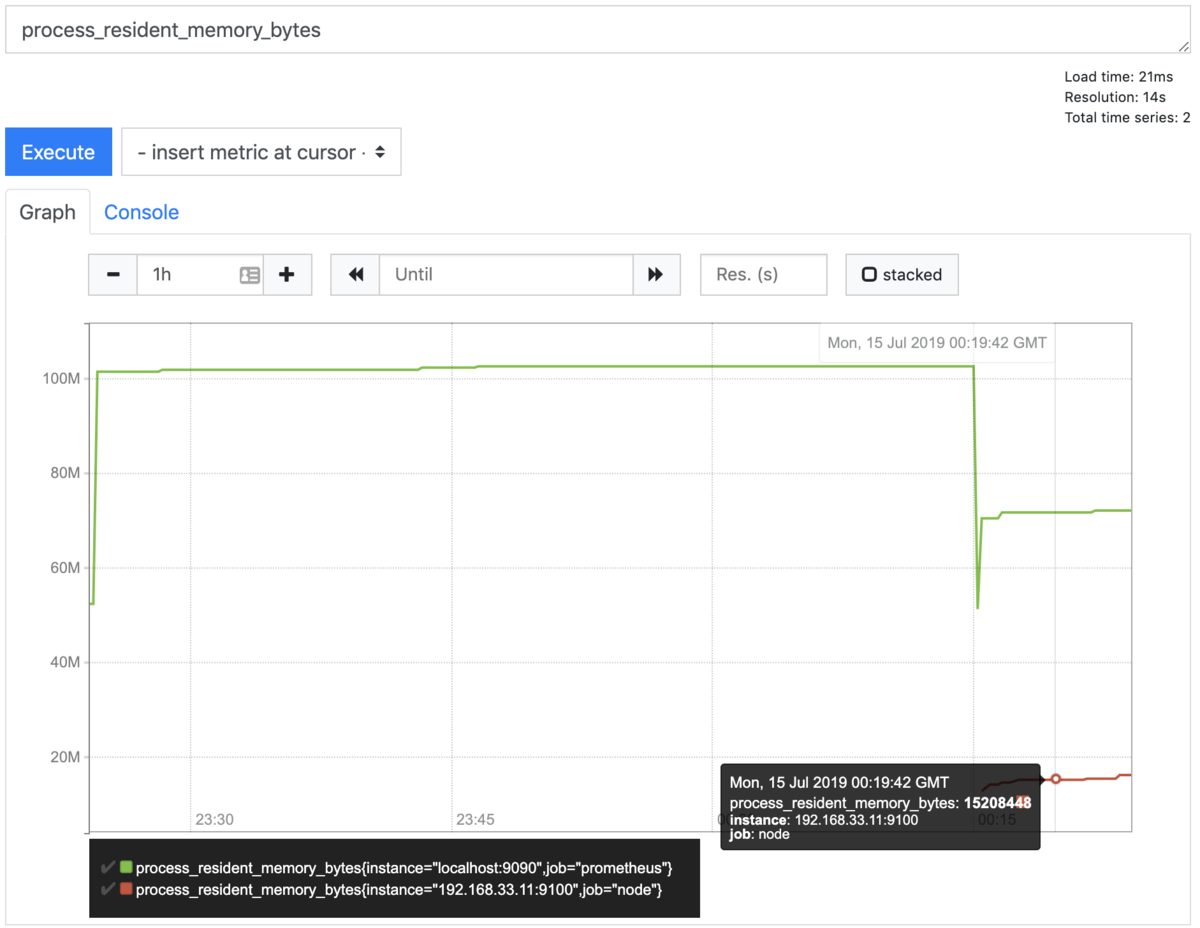
process_resident_memory_bytes
先ほどと同じprocess_resident_memory_bytesをセットしてみると、

prometheusプロセスや、Node exporterプロセスのメモリ使用量が確認できます。
まとめ
インストール〜WebUIを用いたPromQLの使い方など、Prometheusの基本的な使い方を説明しました。